Introduction
Apparel design as a discipline and industry has often been characterized as highly resistant to change in processes. This is in no small part due to the extremely short product cycle (traditionally 3-4 months, and shortening every day) and ever-increasing pressure to reduce costs and produce faster. Other product-producing industries such as consumer products or automobiles embraced 3D simulation and visualization technologies decades ago and have reaped the benefits in shorter and more accurate design and product development processes. By contrast, the apparel industry has been much slower to adopt even 2D CAD-based drawing systems for garment patternmaking, never mind full 3D simulation technologies.
An additional not-insignificant challenge is the difficulty of simulating and modeling apparel and textile products. Hard goods are much more stable than flexible, supple fabrics, and the physics of hard goods are consequently simpler and more easily simulated. As a result, simulations of apparel products are less accurate and reliable than hard goods, and this factor has indeed contributed to the reluctance to adopt 3D apparel simulation technologies in the product development process.
However, although such technologies may be only almost mature enough for industrial practice, as teaching tools they offer unparalleled advantages in shortening the trial-and-error feedback loop and enabling more effective visualization of the relationship between the 2D pattern and the 3D body/garment relationship. This chapter will discuss efforts and experiences integrating 3D simulation technologies (3D body scanning and 2D/3D garment simulation) into the apparel design curriculum.
Background
Traditional garment patternmaking methods
In traditional practice, garment patterns are created by drafting methods on paper (plotting body measures to arrive at a basic shape and manipulating that shape into a garment design) or by draping fabric directly onto a body form to capture a 3D shape. These patterns are then refined and subsequently cut from inexpensive test fabric or from fashion fabric, sewn into garments (either unfinished test garments or fully-finished garments) and fit onto a dress form or body. The cutting/sewing process is time-consuming, even for unfinished test garments, and especially for inexperienced students. In most cases, it is only at the fitting stage that the student is able to fully see the effects of their choices in the patternmaking process and to discover errors or inaccuracies that were overlooked. This effect is again magnified for inexperienced students, who are not yet aware of common pitfalls or of the necessity for precision/accuracy in specific areas. Similarly, because these errors are often by nature unexpected, students do not always leave adequate time for what can be very significant revisions (which may mean essentially starting over with the project.)
Lastly, because the fitting process must happen in 3D, students are generally prohibited from making patterns/garments for their own body (because it is prohibitively difficult to effectively fit a garment on one’s own body). While this may seem like a minor issue, for new apparel students, designing for themselves can be a particularly passionate undertaking and can stimulate increased dedication to and engagement with the learning process. Similarly, actually wearing their own patterns can add an additional layer to the understanding of fit, as the student “feels” the fit of the pattern in addition to visual assesment.
3D simulation of Garments
3D garment simulation technologies are becoming more widespread, and are available from several different sources [REFs]. Some approaches seek to create a visually realistic rendering of a garment on a 3D body or avatar (without necessarily using a specific 2D garment pattern. Such systems are more common in gaming or virtual environments such as Second Life, and in online shopping applications. Other approaches use the actual 2D garment pattern to generate the 3D shape, “sewing” the pieces together and applying physics models to simulate the fall, fit, and drape of the garment on a specific body. It is the latter system that is of interest to apparel design, as it preserves the very specific relationship between the 2D garment pattern and the 3D garment, as depicted in Figure 1. The system we have adopted in our teaching practice is the OptiTex PDS system, one of the most advanced and mature 3D garment simulation systems used in the apparel industry today.
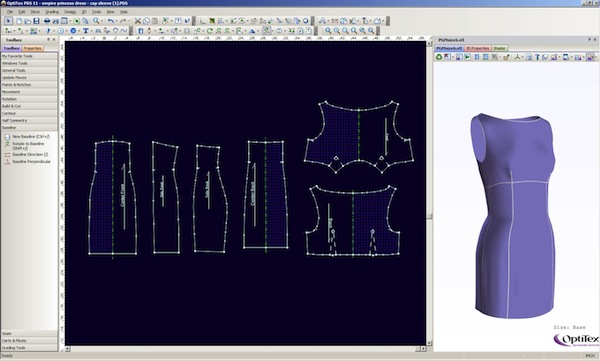
Figure 1: 2D garment pattern and 3D simulation
3D body scanning
While the relationship between the 2D pattern and the 3D garment is crucial in teaching patternmaking through 3D simulation, the success of the 2D shape is judged by the relationship between the 3D garment and a specific 3D body. Most 3D simulation software packages come with body avatars, either with fixed dimensions or with adjustable/customizable measurements. Customizable avatars can be adjusted to some extent but often rely on certain dimension relationships or placements, and fully customizing a very complex 3D shape can be a difficult undertaking.
3D body scanning offers the ability to quickly (in about 7 seconds) capture the 3D surface of almost any object or person. A scanned body can then be imported into the virtual environment to serve as the fitting avatar in simulation. 3D scanners are expensive and not extremely common, but have significant potential for customization and adaptation of garment fit.
3D Simulation in the Curriculum
In 2009, we began integrating the OptiTex 3D simulation software into a sophomore-level apparel design studio course. This is a required course, the second studio course in a series of 5 that make up the backbone of our apparel design curriculum. This studio is the second course in which students study patternmaking: in their first course, they are introduced to the basics of flat patternmaking (drafting) and draping techniques. In the second course, they explore more advanced patternmaking including more complicated shapes, and are introduced to the CAD-based patternmaking system.
In the second patternmaking course, it becomes increasingly important that students understand how a 2D shape transforms into a 3D garment, and the ways in which changes to the 2D shape manipulate the 3D garment. Many students struggle with visualizing the 2D-3D spatial transformation, which makes it considerably more difficult to problem-solve and determine where changes need to be made in the fitting and pattern design process.
In the course discussed here, students interact with the 3D simulation environment in two major projects. In the first project, students are required to design, pattern, and make a pair of trousers of their own design. In the second, students are required to design and pattern a mini-line of 4 garments that expand upon the concept and aesthetic explored in one of their previous course projects. Students may elect to sew up their patterns as unfinished test garments (fitting muslins) or as 3D simulations. For the sake of space, the trouser project is detailed below. Similar advantages and challenges exist for the line project.
Trouser project
In the trouser project, students first learn to draft a trouser block (basic trouser shape with no styling) using the 2D drafting program. They then fit this block onto their body scan or avatar, “perfecting” the fit as far as they are able in the 3D simulation environment. They then print their fitted pattern and cut it from muslin or test fabric, which is sewn and fitted on their physical body. Fitting changes from the fabric iteration are made to the digital pattern before that pattern is used to create the pattern for their own trouser design. This garment is then fitted digitally and (optionally) in fabric, before it is cut and sewn into the final garment.
In total, students fit two pairs of trousers in this project, and both pairs are fitted both digitally and physically. While the same iterative process could have been achieved on paper before the integration of the simulation environment into the course, iterations would have taken considerably longer. Particularly in fitting trousers, there are many adjustments to the pattern that would necessitate re-cutting the pattern from scratch (for example, changes to the crotch curve often involve shifting the contour into an area that has been previously cut away).
An example of the trouser project process (digital and physical block, digital and physical trouser design) is shown in Figure 2.
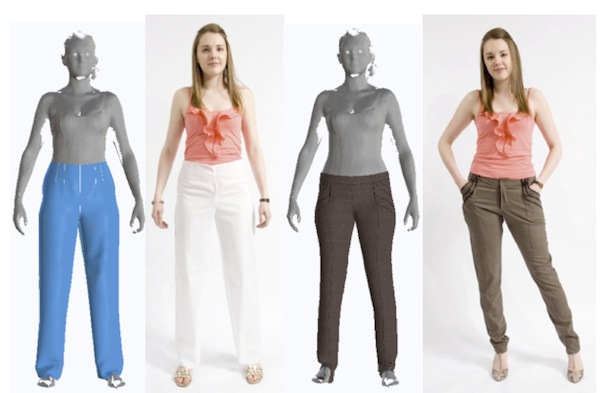
Virtual block fitting/ Physical block fitting/Virtual design fitting/Physical design fitting
Figure 2: Trouser project process
While we currently do not have data capturing the number of fit iterations possible using the traditional method, we observed over 10 iterations of complex areas such as crotch curves using the digital tools.
Challenge and Advantages of 3D Simulation
We see the 3D simulation technology as offering the following advantages in learning patternmaking and fit:
- Dramatic decrease in time required for 3D pattern tests
- Augmented visualization of the transition between 2D and 3D
- Enhanced visualization of the relationship between garment and body
However, we see the following drawbacks of the 3D environment versus patternmaking in the physical world:
- Discrepancies between visualized fit and actual fit
- Adoption of a “trial and error” mentality in problem-solving
- Inability to touch, pull, and pin the fabric in fitting
- Necessity of perfect digital copies of physical “bodies” (human or mannequin) in the digital environment
Advantages
The most obvious advantage of the 3D simulation technology (as discussed previously) is the decrease in time required to cut and sew test garments. However, there are other significant advantages that may be less obvious initially but equally powerful in the educational process.
One of the more powerful aspects of the 3D simulation process for education is perhaps an unintentional feature: the frame-by-frame animation of the 2D pattern wrapping around the 3D body. Because this happens slowly enough to be observed, it allows students to more fully visualize how a 2D pattern becomes a 3D garment (and to localize areas where pattern changes may need to occur, and map them from the 3D garment back to the 2D pattern.) This wrapping process is shown in Figure 3.
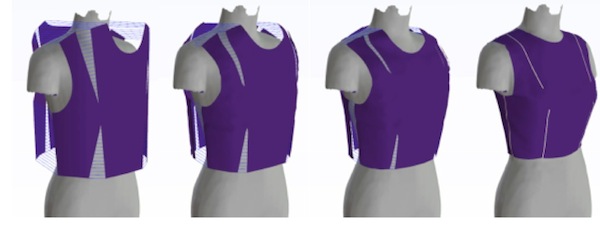
Figure 3: Wrapping 2D garment pattern
Finally, 3D simulation offers the ability to visualize garments in unique ways. For example, one of the fabric parameters that can be adjusted is its transparency – perhaps originally for the purposes of realistic visualization transparent fabrics. Importantly for fitting, this feature allows students to set their simulated garments to some degree of transparency, allowing them to explore in 3D the distance between the garment and the body in various areas. Seeing areas of tightness or compression can be challenging in the visualization, but this feature offers an alternative sensing modality. Similarly, fabric properties can be adjusted in shininess, changing the reflectance of the garment surface. This enhances the appearance of wrinkles and pulls in the garment, helping the student to see more dramatically where problem areas are occurring. Transparency and shininess properties are illustrated in Figure 4.
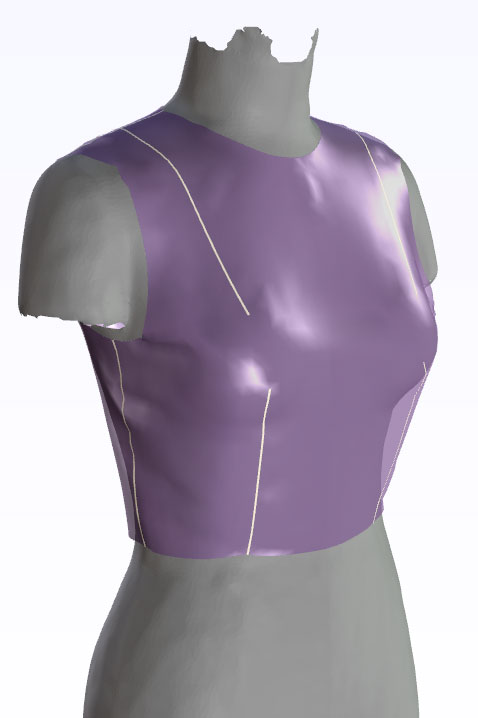
Figure 4: Using transparency and shininess to illuminate and explore fit issues
Challenges
While there are distinct advantages to using 3D simulation for apparel patternmaking education, there are also areas of significant challenge. The 3D simulation is not a perfect representation of the real world, and this gap must be navigated by the student in order to fully leverage the technology. Fit in the physical world comes with certain sets of indicators (wrinkles, tightness, balance and hang of the garment) that the student must learn in the course of their patternmaking and fit education. The 3D simulation environment also comes with fit indicators, but they are not necessarily exactly the same as the indicators in the physical environment. The simulated garment has a tendency to behave more like “clay” than fabric would be – wrapping to fit the body when in the physical world the garment would be too small to close or fit around the body. It’s important to note that “bodies” in the virtual environment also don’t share the same physics as bodies in the physical world – most importantly, they are rigid shells that are not able to compress in the same way as flesh.
The virtual environment offers different indicators that may replace some or all of the missing physical fit indicators. Transparency, as discussed above, is one such example. Another example is tension mapping, as illustrated in Figure 5, which can depict the areas in which the simulation calculates greater or lesser tensions in the fabric.
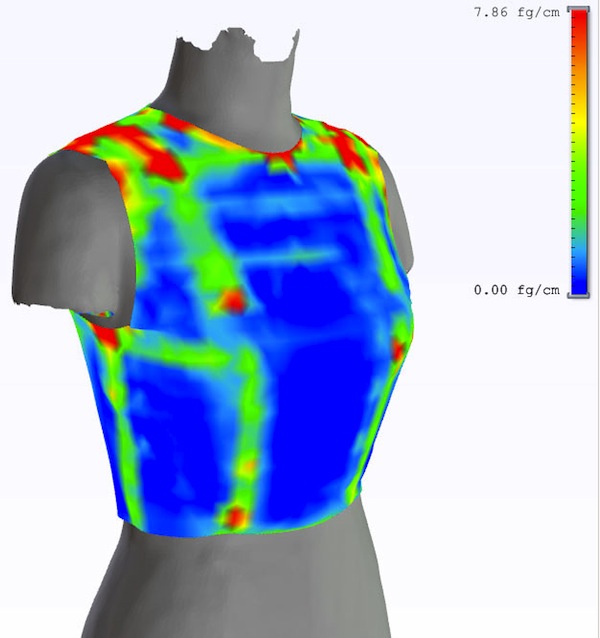
Figure 5: Tension maps for illustrating fit
Another challenge of integrating the 3D environment stems from one of its chief advantages: the decrease in time required to “sew” a test garment to see the effects of a pattern change. While this certainly eliminates significant amounts of time for the student, it also can have the effect of encouraging “trial and error” approaches to problem-solving, where the student invests less time in the cognitive labor of understanding a problem and devising a solution, and instead simply moves contours until something works. The trial and error approach can be deceptive – in our experience, it often leads to far more time-intensive fitting processes than deliberate changes would.
An immediate drawback to the virtual environment is the inability to manipulate the “fabric” on the avatar. In the physical world, fittings are mainly performed by pinning excess fabric and releasing too-tight seams. This direct manipulation can help the designer to “debug” the pattern or localize problem areas. Without the ability to manipulate the fabric, the pattern correction process is necessarily more abstract.
Finally, a logistical challenge. We have discovered the utmost importance of having perfect or near-perfect digital copies of the physical bodies that students are working with, in order to prevent unexpected and lengthy correction processes when the digital pattern is transferred into the physical world. This has illuminated the necessity of access to 3D scanning technology, both for human bodies and for mannequins or dress forms. We have scanned all of our studio dress forms so that students may work on perfect copies of their selected forms in the digital environment (Figure 6). This process is time-intensive and expensive, but once digital copies exist they are easily transferred and duplicated. An open-source approach to sharing these files may facilitate more wide-spread use of efficient processes.
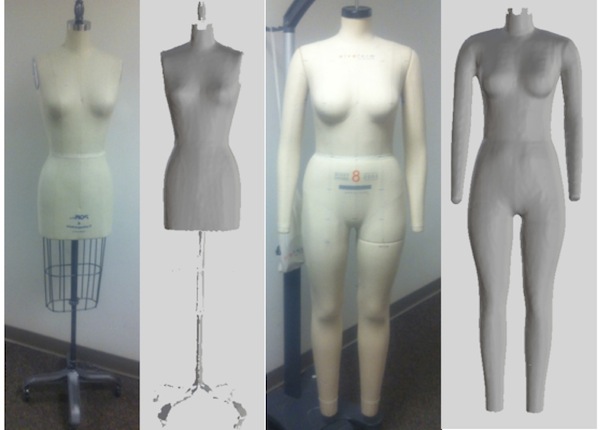
Figure 6: Physical and digital versions of studio dress forms
Conclusion
As with most new technologies, there are advantages and drawbacks to implementing 3D simulation in the apparel curriculum. We have discussed advantages in student engagement (through facilitating patternmaking and fitting on the student’s own body), efficiency and speed of generating garments to test patterns and fit, augmenting the ability of the student to visualize the transition from 2D pattern to 3D garment, and augmented ability to explore the fit relationship between garment and body.
However, there are also drawbacks and challenges to implementing this kind of technology as compared to traditional processes in the physical world. Many of these drawbacks stem from immaturity or development opportunities in the technology itself, and others may be more difficult to overcome. These challenges as discussed here include inability to touch, feel, and manipulate the garment on a body; encouragement of a trial-and-error mentality in problem-solving; discrepancies in fit indicators between the physical and digital world; and necessity for perfect digital copies of fit bodies in the digital environment (which often requires access to expensive 3D scanning technology).